What is a cotter pin?
A cotter pin (called a split pin in Australian workshops) is a folded length of soft metal wire inserted through a drilled hole in a shaft or bolt, with the two legs bent apart to lock the assembly. The pin's only job is to stop a castle nut, clevis pin, or shaft collar from rotating loose. Sized by diameter and length (3mm × 25mm, 4mm × 40mm etc.), commonly stainless or zinc-plated steel, specified to ISO 1234 / DIN 94 (the metric dimensional standard for split pins).
Are cotter pins and split pins the same thing?
Yes — "cotter pin" (US) and "split pin" (Australia, UK) are the same fastener. The term "cotter" originally referred to a tapered wedge pin used in bicycle cranks; modern usage covers both. AIMS stocks both metric and imperial sizes under the split pin name.
A cotter pin — called a split pin in Australian workshops, trade stores, and on engineering drawings — is one of the most fundamental fasteners in industrial and agricultural use. It does one job and does it well: it prevents a nut, pin, or shaft from moving by passing through a drilled hole and bending to lock the assembly. No threads, no torque spec, no adhesive. Just a small piece of bent wire that holds everything in place.
The confusion starts with the name. In Australia, "split pin" is the dominant trade term. In the United States and on many product labels, the same item is called a "cotter pin." Both refer to the standard two-pronged, U-section fastener governed by DIN 94 / ISO 1234. Related but distinct products — R-clips, lynch pins, hammer lock cotters — are frequently confused with split pins and with each other. This guide covers all of them: what they are, which sizes to use, correct installation technique, removal, and material selection. If you work with machinery, agricultural equipment, automotive, or rigging, this is the reference article for the whole family of pin-retention fasteners.
For clevis pins, shackles, and wire rope rigging where split pins secure clevis assemblies, see our Wire Rope & Rigging Guide. AIMS Industrial stocks split cotter pins in metric and imperial sizes, SS316 stainless, assortment packs, and R-clips — browse the full range here.
Split Pin / Cotter Pin Quick Reference — ISO 1234 Metric Sizes
In Australia, "split pin" and "cotter pin" refer to the same fastener — a folded wire pin inserted through a drilled hole and bent to lock parts in place (per ISO 1234 for metric sizes). The nominal diameter matches the drilled hole; the actual wire diameter is ~0.05mm undersize to allow insertion. Standard metric sizes range from 0.6mm to 13mm nominal.
| Nominal Ø (mm) | Recommended Hole Ø | Common Length Range | Typical Use |
|---|---|---|---|
| 1.6 | 1.7 mm | 10–32 mm | Light hardware, hobby, model-engineering |
| 2.0 | 2.1 mm | 10–40 mm | Castle nut M8-M10, small linkage |
| 2.5 | 2.6 mm | 16–50 mm | Castle nut M10-M12, trailer hardware |
| 3.2 | 3.4 mm | 18–63 mm | Castle nut M12-M14, trailer hubs |
| 4.0 | 4.2 mm | 20–80 mm | Castle nut M14-M16, agricultural linkage |
| 5.0 | 5.2 mm | 25–100 mm | Heavy machinery, large castle nuts |
| 6.3 | 6.6 mm | 32–125 mm | Truck axles, castle nuts M20+ |
| 8.0 | 8.5 mm | 40–160 mm | Heavy plant, very large castle nuts |
What Is a Cotter Pin (Split Pin)?
A cotter pin (split pin) is a metal fastener made from a length of wire folded in half to form a U-section with a rounded head (the eye) at the fold. The two prongs (legs or tines) of the pin are inserted through a transverse hole in a bolt, shaft, or clevis pin, and then bent apart on the exit side to prevent withdrawal. The bent legs bear against the surface and resist any force that would pull the pin back through the hole.
The classic pairing for a split pin on a rotating shaft assembly is the castellated (castle) nut — for slot count, AS 1112.4 / ISO 7035 dimensions and torque-to-slot-alignment technique, see the dedicated castle nut guide.
The mechanism is simple and reliable: the pin occupies the hole snugly, and the bent legs create a mechanical lock that cannot be pulled out without deliberately straightening them first. This is why split pins are used as safety-retention fasteners rather than as load-carrying fasteners. Their job is not to bear the fastener load — the bolt or castle nut does that — but to ensure the bolt or nut cannot back off even if the primary clamping load is lost.
How Cotter Pins Work in a Joint
The most common application is securing a castellated (castle) nut on a threaded shaft. The nut is tightened to its specified torque, the castellation slot is aligned with the drilled hole through the bolt shank, and the split pin is inserted through both. When the legs are bent, the assembly cannot loosen — even if vibration or shock loads would otherwise cause the nut to back off. The split pin does not carry axial load. It is a failsafe that keeps the nut in position.
The same principle applies to clevis pins: a clevis pin passes through a clevis bracket and a connecting rod eye, and a split pin through the transverse hole at the end of the clevis pin prevents the pin from withdrawing from the clevis.
Cotter Pin vs Split Pin: Australian Terminology
In Australia, "split pin" is the standard workshop and trade term. You will hear "split pin" from mechanics, agricultural engineers, riggers, and trade counter staff. Engineering drawings produced to Australian standards typically use "split pin." The term "cotter pin" appears on product labels (particularly Champion brand and US-origin products), in some engineering reference material, and is the dominant term in North America.
Both terms refer to the same fastener: the two-pronged U-section wire pin standardised under DIN 94 / ISO 1234. In this guide, both terms are used interchangeably — they are the same product.
Types of Split Pins (Cotter Pins)
Standard Split Cotter Pin (the common type)
The standard split cotter pin is what almost all references to "split pin" or "cotter pin" mean. Made from wire folded to a U-section, it has two prongs of equal length that are spread after installation. Available in zinc-plated mild steel, stainless steel (A2 Grade 304 and A4 Grade 316), and brass. Governed by DIN 94 / ISO 1234. This is what AIMS Industrial stocks in metric sizes from 1.6mm to 8mm diameter in zinc plate and SS316, plus imperial sizes in assortment packs.
Installation: insert the pin through the hole until the eye is flush with the entry face. Spread the prongs — one bent back over the nut or fitting (wrap-around method) or one forward and one back (cross-bend method). Both methods are acceptable for non-critical applications. See the installation section below for the correct technique for safety-critical joints.
Hammer Lock Cotter Pin
A hammer lock cotter pin has a hinged or locking tab that is driven closed with a hammer after installation, positively locking the legs in the spread position. These are used in high-vibration environments where there is a risk that standard bent prongs could gradually straighten over time — specifically in railway, heavy plant, and mining applications. Less common in general industrial use. Not standard stock at AIMS but available to order.
Extended Prong Cotter Pin
An extended prong cotter pin has legs of different lengths — one significantly longer than the other — to allow the longer leg to wrap fully around the shaft or fastener for a more positive retention. Specified in some aerospace and defence assembly standards (notably AS/NZS and MIL-spec documents) for safety-critical flight control and structural fasteners. In commercial industrial use, the standard equal-prong type is used in the vast majority of applications.
R-Clips (Hairpin Cotter Pins): A Different Fastener for Quick-Release Applications
An R-clip — also called a hairpin cotter pin, R-pin, hitch pin clip, or bridge pin — looks nothing like a standard split pin. It is made from a single piece of spring-tempered wire bent into a shape resembling the letter R. The straight leg inserts through the pin hole; the curved spring section grips the shaft to retain it. R-clips are designed for quick manual installation and removal without tools and are reusable — the spring wire returns to shape when removed.
R-clips are the correct choice when an assembly needs to be opened and closed repeatedly: trailer hitch pin retention, implement attachment on three-point linkages, agricultural equipment that is regularly fitted and removed, and gate pins. They are not a substitute for split pins in safety-critical permanent or semi-permanent joints — the spring retention of an R-clip is lighter than the positive mechanical lock of a bent split pin.
AIMS Industrial stocks R-clips in a range of sizes and assortment kits — Austlift, Champion, and GJ Works brands — available individually and in assortment sets covering shaft sizes from 3/8" to 1". Browse R-clips at AIMS Industrial.
R-Clip Size Selection
R-clips are sized by the shaft diameter they are designed to grip — not by the hole diameter. The key dimension is the inside diameter of the circular grip section, which must match the shaft. Measure the shaft (hitch pin, clevis pin, or fastener shank), not the hole, when selecting an R-clip size. Common shaft sizes in agricultural and trailer applications are 1/2", 5/8", 3/4", 7/8", and 1".
Lynch Pins and Linch Pins
A lynch pin (also spelled linch pin) is a distinctly different fastener that is frequently confused with split cotter pins and R-clips. A lynch pin secures a wheel, implement, or component to an axle or shaft by passing through a hole and using a spring-loaded clip or keeper that snaps over the shaft end to hold the pin in position. Lynch pins are larger, heavier, and designed for higher loads than split pins or R-clips.
The defining characteristic of a lynch pin is that it can only be fitted at the end of a shaft or axle — not at an intermediate point — because it captures the shaft end between the pin head and the keeper clip. They are the standard retention pin for agricultural wheels on three-point linkage implement hubs, power harrows, disc tillers, and trailer axles.
| Feature | Split Cotter Pin | R-Clip | Lynch Pin |
|---|---|---|---|
| Reusable? | No — single use | Yes | Yes |
| Installation | Bend legs with pliers | Tool-free, push in | Push in, keeper clips over shaft |
| Removal | Straighten with pliers, discard | Pull tab, remove | Pull keeper, withdraw pin |
| Load capacity | Low (safety retention only) | Low (quick-release) | Medium-high (axle retention) |
| Shaft position | Any transverse hole | Any transverse hole | End of shaft only |
| Primary use | Castle nuts, clevis pins | Hitch pins, quick-release | Wheel and implement retention |
Split Pin Sizes: DIN 94 Metric Sizing Guide
Split cotter pins are dimensioned by two measurements: nominal diameter (the wire diameter, which equals approximately half the pin width across the U-section) and length (from the eye to the tip of the shorter leg). The nominal diameter determines the hole fit; the length must be sufficient to allow the legs to be bent after passing through the material.
The correct diameter is one that fits snugly in the hole with minimal lateral play. DIN 94 specifies that the pin diameter should be approximately 0.1–0.4mm smaller than the hole diameter. A loose-fitting pin in an oversized hole will rattle under vibration and can wear through the hole over time, allowing withdrawal. Do not use a pin that requires significant force to insert — the hole is likely undersized.
| Nominal Diameter | Fits Hole Diameter | Common Length Range | AIMS Stock |
|---|---|---|---|
| 1.0mm | 1.0–1.4mm | 10–16mm | — |
| 1.2mm | 1.2–1.6mm | 12–20mm | — |
| 1.6mm | 1.6–2.0mm | 14–32mm | ✓ Zinc plate & SS316 |
| 2.0mm | 2.0–2.4mm | 16–40mm | ✓ Zinc plate & SS316 |
| 2.5mm | 2.5–3.0mm | 20–50mm | ✓ Zinc plate & SS316 |
| 3.2mm | 3.2–3.6mm | 25–63mm | ✓ Zinc plate & SS316 |
| 4.0mm | 4.0–4.5mm | 32–80mm | ✓ Zinc plate & SS316 |
| 5.0mm | 5.0–5.5mm | 40–100mm | ✓ Zinc plate & SS316 |
| 6.3mm | 6.3–7.0mm | 50–125mm | ✓ Zinc plate & SS316 |
| 8.0mm | 8.0–8.8mm | 63–160mm | ✓ Zinc plate & SS316 |
| 10.0mm | 10.0–11.0mm | 80–180mm | Available on request |
| 13.0mm | 13.0–14.0mm | 100–200mm | Available on request |
Imperial Split Pin Sizes
Imperial cotter pins remain common in Australian agricultural and older machinery applications — particularly equipment originally built to American or British inch specifications. AIMS stocks imperial assortment packs covering the most commonly used sizes.
| Imperial Size | Metric Equivalent (approx.) | Common Applications |
|---|---|---|
| 1/16" | 1.6mm | Small clevis pins, light fasteners |
| 3/32" | 2.4mm | Light agricultural, instrument linkages |
| 1/8" | 3.2mm | General agricultural, hitch pins |
| 5/32" | 4.0mm | Medium agricultural equipment |
| 3/16" | 4.8mm | Three-point linkage, trailer components |
| 1/4" | 6.4mm | Heavy hitch pins, large clevis assemblies |
| 5/16" | 7.9mm | Heavy-duty agricultural and plant |
Material Guide: Zinc-Plated Steel vs Stainless Steel
Zinc-Plated Mild Steel (Standard)
Zinc-plated mild steel is the default material for split cotter pins and the correct choice for the majority of industrial, agricultural, automotive, and general-purpose applications. Zinc plating provides light corrosion resistance — adequate for indoor and protected outdoor environments where the fastener is not subject to salt spray, prolonged water immersion, or aggressive chemical exposure. The zinc coating also makes the pin easy to see (the bright silver finish is visible during inspection) and provides mild galvanic protection to surrounding ferrous components.
Zinc-plated pins should not be used in direct salt water contact, food processing environments, or chemical environments where zinc corrodes rapidly. The zinc layer is relatively thin on fasteners — typically 5–8 microns — and will not survive extended marine exposure.
Grade 316 Stainless Steel
SS316 (A4 grade) cotter pins are the correct choice for marine applications, food processing equipment, chemical plant, and other environments where zinc-plated steel would corrode. Grade 316 offers superior chloride resistance compared to 304, making it the right material for coastal and offshore environments.
One practical note on stainless split pins: they are softer than zinc-plated steel and the legs must be bent carefully to avoid cracking. Apply steady plier pressure rather than sharp bends. This is less of an issue with 316 than with some 304 grade pins, but applies to both. AIMS stocks SS316 in the full 1.6mm–8mm range matching the zinc-plated range.
Brass
Brass split pins are used in specific electrical and non-sparking applications — switchgear, flameproof enclosures, and environments where ferrous materials are prohibited. Not standard AIMS stock but available on request for specific applications.
Where Split Pins Are Used: Applications by Fastener Type
Castellated (Castle) Nuts
The most common application in automotive, agricultural, and mechanical engineering. A castellated nut has six slots cut around its crown that correspond to a drilled hole in the bolt or shaft. When the nut is tightened to torque and the slots align with the hole, the split pin passes through both, and its bent legs lock the nut in position. Used on wheel hub nuts, suspension ball joints, tie rod ends, steering rack adjusters, and any joint where the nut must be positively retained against vibration-induced loosening and the joint may need future disassembly.
Alignment is critical: the nut must be tightened to its specified torque, then further turned (not backed off) until the nearest slot aligns with the bolt hole. On some designs this requires precise torque specification and slot positioning. Never back off the nut to achieve alignment — this reduces clamp load in the joint.
Clevis Pins
A clevis pin connects a clevis bracket to a rod end or yoke. The pin passes through aligned holes in the clevis fork and the connecting component, with a head on one end preventing full withdrawal. The split pin passes through the transverse hole at the opposite (shank) end of the clevis pin, retaining it in the assembly. Used extensively in lifting and rigging, hydraulic cylinder mounts, trailer hitches, and agricultural three-point linkage connections.
Axle and Shaft Pins
On wheel axles, swivel joints, and shaft pin assemblies, split pins pass through a hole in the shaft end to retain a washer or component against withdrawal. This is the axle pin retention application seen on garden equipment, small trailers, and older vehicle axles — distinct from castellated nut retention but using the same pin and technique.
Hitch Pins and Drawbar Pins
Hitch pins (the large straight pins used to connect implements to tractor drawbars and three-point linkages) are retained by either a split pin or an R-clip through their transverse hole. Where the pin is fitted and removed repeatedly, an R-clip is the practical choice. Where the pin is semi-permanent (fitted and left in position for extended periods), a split pin is more secure.
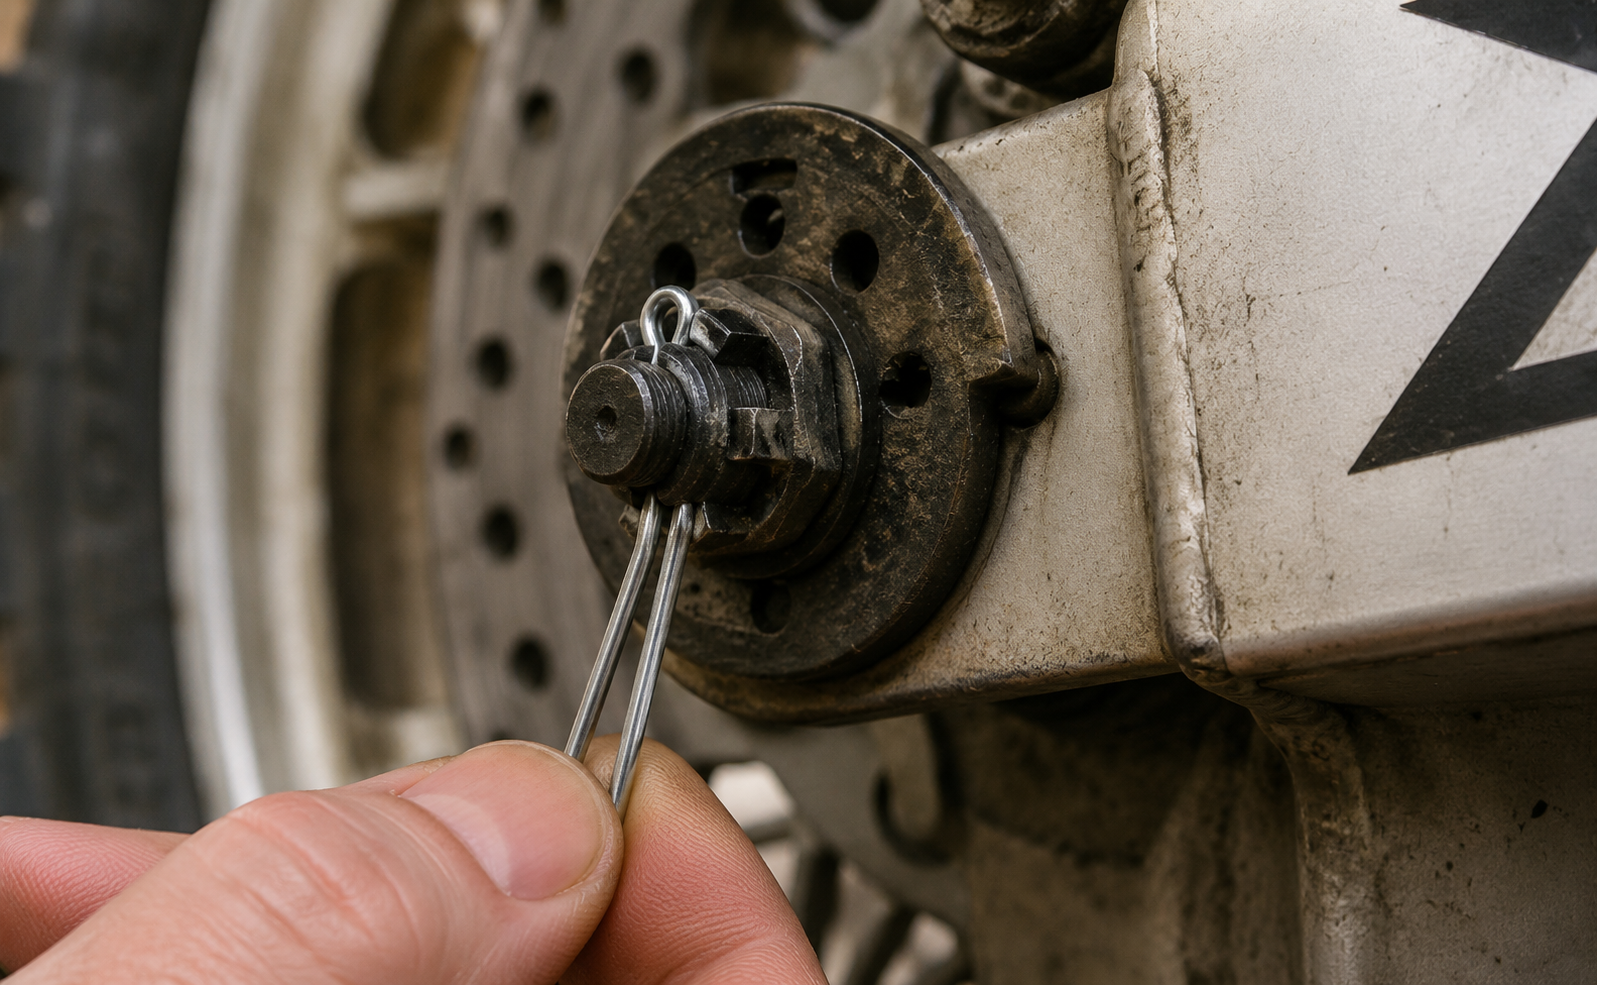
How to Install a Cotter Pin: Step-by-Step
Correct installation takes about 60 seconds and requires only a pair of pliers. The steps below apply to the standard split cotter pin in all applications.
- Select the correct size. The pin diameter must fit snugly in the hole — no lateral play. The pin length must be sufficient for the legs to extend fully past the exit face and allow bending. For castellated nuts, confirm the nut is at the correct torque and the slot is aligned with the hole before selecting pin length.
- Insert the pin eye-first. Push the pin through the hole from the inside face (or from the bolt side on a castellated nut) until the eye is flush with or slightly inside the entry face. Both legs should extend past the exit face by at least the pin diameter — if they do not extend enough, select a longer pin.
- Spread the legs. Using pliers, bend one leg back against the face of the nut or fitting, bending it 90° or more so it lies flat against the surface. Bend the other leg in the opposite direction — forward along the bolt shank or around the shaft. This is the correct two-direction bend that provides positive retention in both rotational directions.
- Verify the installation. The eye should be flush or slightly recessed at the entry face. The bent legs should be in contact with the surface — not projecting freely. A correctly installed pin cannot be pulled out by hand. The legs should not be so sharply bent that they show cracking at the bend radius.
Castellated Nut Installation Sequence
- Thread the nut and tighten to the specified torque.
- Check slot alignment with the bolt hole. If the slot does not align, continue tightening (do not loosen) to the next alignment position — typically within 60° of additional rotation on a hex nut with three slot pairs.
- If alignment cannot be achieved within acceptable torque range, consult the assembly specification. Some designs use a thick washer to adjust alignment position.
- Insert the split pin and bend as described above.
- Inspect the completed assembly — the pin should not move when the nut is held and the pin eye is pulled.
How to Remove a Cotter Pin
Removal requires straightening the bent legs sufficiently to allow withdrawal. The process is straightforward but requires care to avoid damaging the surrounding material or breaking the pin legs during removal (a broken leg left in the hole creates a follow-on problem).
- Identify the bent legs. On a correctly installed pin, one leg is bent back against the nut face and one forward along the shaft. Determine which direction each leg needs to be straightened.
- Straighten the legs. Using needle-nose pliers, grip the bent portion of each leg as close to the eye as possible and bend back toward the straight position. Work gradually — do not apply a sharp one-motion bend, as this increases the risk of cracking a hardened leg partway through, which can leave a fragment in the hole. You do not need the legs to be perfectly straight — just enough for the pin to withdraw without catching.
- Withdraw the pin. Grip the eye with pliers and pull the pin out of the hole. If it catches, straighten the legs a little further. Do not lever or pry the pin — this can damage the hole or the surrounding casting.
- Discard the pin. Do not reuse. Set out a new pin before reassembly.
What If the Pin Is Corroded or Seized?
On pins that have been in service for extended periods in outdoor or marine environments, corrosion can bond the pin to the hole. Apply a penetrating lubricant (CRC, Inox, or WD-40) to the pin and allow 10–15 minutes to penetrate before attempting removal. On severely corroded pins, the safest approach is to drill the pin out at the hole diameter — a 3.2mm drill on a 3.2mm pin — rather than risk breaking a seized leg and losing it in the hole. After drilling, clean and inspect the hole for elongation before fitting a replacement pin.
Can You Reuse a Cotter Pin?
No. This is not a preference — it is a safety principle.
When a split pin leg is bent during installation, the metal at the bend undergoes work hardening. The crystalline structure of the wire changes at the bend point, making the material harder but also more brittle. When you attempt to re-bend that hardened zone during removal (straightening) and reinstallation (re-bending), you are applying strain to an already-stressed material. The leg is significantly more likely to crack at the original bend radius during the second bend cycle than it would have been during the first.
A cracked pin leg that breaks off during reassembly and remains in the assembly is a foreign-object contamination risk. A pin that appears intact but has internal micro-cracking at the bend may fail under vibration after a short service interval — with no external warning sign.
Split pins are low-cost consumables. A pack of 50 Champion metric pins costs a few dollars. There is no rational case for reusing a pin that costs a fraction of a cent to replace. Always fit a new pin at every assembly.
Common Mistakes
1. Using the Wrong Size Diameter
A pin that is too small for the hole will rattle and allow movement of the retained component. Under vibration, the pin wears the hole oval, progressively worsening the fit until the pin withdraws. Match the pin diameter to the hole within the DIN 94 tolerance — snug fit with no lateral play. If in doubt, size up, not down.
2. Bending Both Legs the Same Direction
Bending both legs forward (or both back) is a common installation shortcut that provides retention in only one direction. On a castellated nut, this means the nut can still potentially rotate in the direction that would loosen it if the leg is oriented incorrectly. Bend one leg each way — it takes the same amount of time and provides proper two-direction retention.
3. Using a Pin That Is Too Short
If the legs barely emerge from the exit face, there is insufficient material to bend. Forcing a bend on a short leg produces a sharp bend very close to the eye, which concentrates stress at the exit point rather than along the leg. Select a length where the legs extend at least one pin-diameter past the exit face before bending.
4. Reusing a Pin
Covered above. Do not reuse. Replace at every assembly.
5. Using an R-Clip Instead of a Split Pin in a Safety-Critical Joint
R-clips are designed for quick-release applications. Their spring retention is adequate for trailer hitch pins and agricultural implement attachment, but is not equivalent to a correctly bent split pin for safety-critical retention of brake, steering, or lifting equipment fasteners. If the service manual or engineering specification calls for a split pin, fit a split pin.
6. Not Checking Slot Alignment Before Inserting the Pin
On castellated nuts, the slot must align with the hole. If the hole is not visible through the slot with the nut at correct torque, the pin cannot be properly installed — and the temptation is to back the nut off slightly to achieve alignment, which reduces joint clamp load. The correct response is to use a different washer thickness, consult the assembly spec, or source a castellated nut with different slot geometry. Never back off a nut to achieve cotter pin alignment.
7. Ignoring Pin Condition on Maintenance Inspections
Split pins degrade in service — corrosion, fatigue from vibration, and physical damage from contact with surrounding components. On safety-critical fasteners (brake calipers, ball joints, wheel hubs, lifting equipment), include split pin inspection in every maintenance interval. A bent, corroded, or fractured pin should be replaced immediately. Replace proactively on any safety-critical fastener during routine service rather than waiting for inspection to reveal damage.
Small part. Big job.
Shop split pins, R-clips & cotter pins — zinc plate & stainless stocked
From DIN 94 zinc plated split pins for general use to stainless A2 for marine and outdoor applications — AIMS Industrial stocks split pins, R-clips, and hair pins across all metric sizes, ready to ship Australia-wide.
Frequently Asked Questions
What is a cotter pin used for?
A cotter pin (split pin) is used to retain fasteners — particularly castellated nuts, clevis pins, and axle pins — against loosening or withdrawal. It passes through a transverse hole and its legs are bent to prevent it from backing out. The pin does not carry load — it prevents movement of the component it retains.
What is the difference between a cotter pin and a split pin?
There is no functional difference. In Australia, "split pin" is the standard workshop term. In the United States and on many product labels, the same fastener is called a "cotter pin." Both refer to the two-pronged U-section wire fastener standardised under DIN 94 / ISO 1234.
What size cotter pin do I need?
Select a pin whose nominal diameter fits snugly in the hole — no lateral play. The pin should be approximately 0.1–0.4mm smaller than the hole diameter (DIN 94 fit). For length, the pin must extend past the exit face by at least one pin-diameter to allow the legs to be bent. Check the hole diameter with a drill or pin gauge if the correct size is unknown.
Can you reuse a cotter pin after removal?
No. Bending work-hardens the pin legs. A re-bent leg is significantly more likely to crack than a new pin bent for the first time. Split pins are single-use consumables — always fit a new pin when reassembling. They are inexpensive and the cost saving from reuse is not worth the safety risk.
How do you install a cotter pin correctly?
Insert the pin through the hole until the eye is flush with the entry face. Using pliers, bend one leg back against the nut face or fitting surface at 90° or more. Bend the other leg in the opposite direction — forward along the bolt shank. The two-direction bend prevents withdrawal in both rotational directions. Do not bend both legs the same way.
How do you remove a cotter pin?
Grip the bent portion of each leg with needle-nose pliers and gradually straighten toward the original straight position. Work carefully to avoid snapping a corroded leg inside the hole. Once the legs are sufficiently straight, grip the eye with pliers and withdraw the pin. Discard the used pin — do not reuse.
What is an R-clip and how is it different from a split pin?
An R-clip (hairpin cotter pin, hitch pin clip) is a spring-wire fastener shaped like the letter R that provides quick tool-free retention for hitch pins and clevis pins. Unlike a split pin, R-clips are reusable and designed for frequent assembly and disassembly. They are not a substitute for split pins in safety-critical joints — their spring retention is lighter than a correctly bent split pin.
What is the difference between a cotter pin and a lynch pin?
A lynch pin (linch pin) is a larger, heavier pin with a spring-loaded keeper that snaps over the end of a shaft or axle to retain it. Lynch pins can only be used at the end of a shaft, not at an intermediate hole position. They are used for wheel and implement retention on agricultural equipment. A cotter pin passes through any transverse hole and is retained by bending its legs — a different mechanism and application.
When should I use stainless steel cotter pins?
Use SS316 stainless steel cotter pins in marine environments (boats, coastal machinery, offshore equipment), food processing equipment, chemical plant with corrosive exposure, and any application where zinc-plated steel would corrode prematurely. SS316 is the correct grade for chloride environments. For general industrial, agricultural, and automotive use, zinc-plated steel is appropriate and more economical.
What is a castellated nut and how does a cotter pin secure it?
A castellated nut (castle nut) has slots cut around its crown that allow a split pin to pass through after the nut is tightened. The pin passes through the nut slot and the drilled hole in the bolt or shaft. With its legs bent, the pin positively locks the nut against rotation in either direction — even if vibration would otherwise cause loosening. Used on wheel hubs, suspension joints, tie rod ends, and other fasteners requiring positive retention.
What is the DIN 94 standard for split pins?
DIN 94 (equivalent to ISO 1234 and BS 1574) specifies the dimensional requirements for split cotter pins — wire diameter, length, eye diameter, leg spread, and material requirements. Metric split pins conforming to DIN 94 are available in nominal diameters from 1.0mm to 13.0mm. The standard defines the fit tolerance between pin diameter and hole diameter, and the minimum leg length required for installation.
How do you bend a cotter pin correctly after installation?
After inserting the pin, use pliers to bend one leg back at 90° or more against the nut face or the surrounding surface — the leg should be in contact with the surface, not projecting freely. Bend the second leg in the opposite direction, forward along the bolt shank or wrapped around the shaft. Each leg should be bent smoothly without sharp kinks. The completed installation should be firm — the pin should not move when the eye is pulled by hand.
For thread specs, grade markings and metric-to-imperial conversions, see our Fastener Reference Guide.
What is a split pin used for?
Split pins are used to lock castle nuts, clevis pins, axle nuts, and similar fasteners against rotation or sideways movement. They pass through a cross-drilled hole in the shaft or fastener and have their legs bent over to retain them in place. Common applications include trailer hitches, steering linkages, towing equipment, agricultural machinery, and any joint where a nut must not back off.
Is a split pin the same as a cotter pin?
Yes — they describe the same fastener under different names. Split pin is the Australian and British term; cotter pin is the American term. Both refer to a hairpin-shaped wire fastener with two legs that pass through a hole and bend over to lock the joint. They come in standard diameters from around 1mm up to 13mm and various lengths.
How do you remove a split pin?
Straighten the bent legs with pliers or a small punch, then pull the pin out through the hole using pliers or pull it from the head end with a hooked tool. Split pins are designed for one use — once straightened and removed, fit a new pin rather than reusing the old one. Reused pins fatigue and can break in service.
What size split pin do I need?
Match the split pin diameter to the cross-hole in the fastener. Common sizes for automotive and trailer work are 3mm and 4mm; light machinery typically uses 2mm or 2.5mm; heavy equipment uses 5mm or 6mm. The pin should pass through the hole snugly with little play. Length should be enough to bend both legs over the nut or shaft without protruding excessively.
For matched forming tools, browse the AIMS pipe and tube bender range (manual lever, hydraulic, and dedicated tube benders).