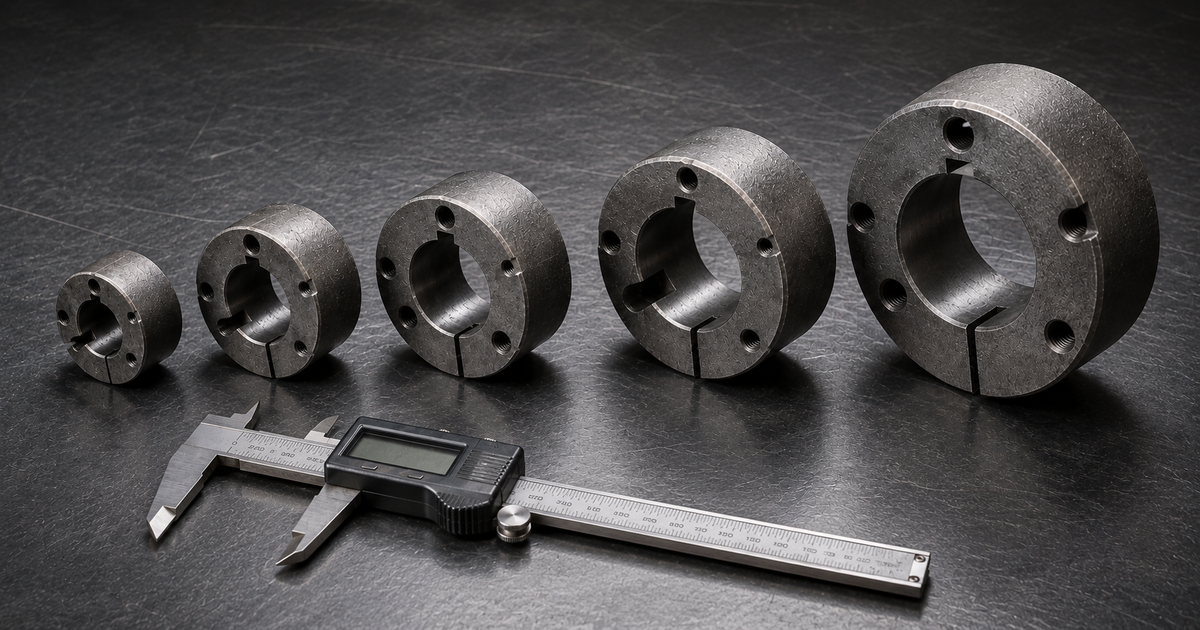
A taper lock bush is one of the most widely used shaft mounting systems in Australian industry — and one of the least understood. Millwrights and maintenance engineers fit them daily on conveyor drives, fan pulleys, pump sheaves, and chain sprockets. But incorrect installation, wrong shaft tolerance, and seized removal are recurring problems that cost far more in downtime than the bush itself.
This guide covers everything: how the 1:12 taper generates its clamping force, decoding the 1008 to 5050 size series, the correct installation and removal sequence, steel versus cast iron selection, and how taper lock bushes compare to QD bushes and keyless alternatives. AIMS Industrial stocks taper lock bushes across all major series — browse the full range here.
For more engineering reference charts and selection tables, see our Engineering Reference Charts hub — covering fasteners, bearings, lubrication, measuring, welding and Australian standards.
What Is a Taper Lock Bush and How Does It Work?
A taper lock bush is a split, tapered sleeve that clamps a power transmission component — pulley, sprocket, sheave, or coupling — onto a shaft. The outer diameter is machined to a 1:12 taper that matches the tapered bore of the hub. The bush is split longitudinally so it can contract slightly when the fixing screws are tightened, generating a high radial clamping force on the shaft and an equal axial force locking the bush into the hub.
The 1:12 taper ratio (approximately 4.76° included angle) is a self-locking geometry. Once the bush is driven home, it stays in place without relying solely on screw pre-load. This is the same principle as a Morse taper in a lathe spindle, but applied to a removable, torque-transmitting joint. The standard governing the dimensional series is BS 4235 Part 2 — all reputable manufacturers conform to this, which means bushes from different suppliers are dimensionally interchangeable across the same series.
Torque is transmitted through a parallel key seated in matching keyways cut in both the bush bore and the shaft. The bush bore and keyway are finish-machined to specified tolerances so the key bears against both faces simultaneously. Without a correctly fitted key, the bush transmits only friction — and friction alone is generally insufficient for sustained industrial loads.
Why taper lock bushes are used instead of press fits or splines: A taper lock bush assembly can be installed, adjusted for position, and removed with simple hand tools. A press fit requires a hydraulic press and an interference-specified shaft. Taper lock bushes also allow the axial position of the pulley to be fine-tuned by inserting the bush to different depths before the screws are torqued — no rework required.
The Taper Lock system was originally developed and patented by Fenner Drives and has been the European and Australian industrial standard for shaft-hub connections since the 1950s. Today, all major power transmission suppliers — Rexnord, SKF, Gates, Fenner, TB Wood's — produce dimensionally interchangeable taper lock bushes to BS 4235 Part 2.
Taper Lock Bush Sizes: Decoding the 1008 to 5050 Series
Every taper lock bush carries a four-digit designation that encodes its size class. Understanding the numbering system is essential for correct selection — choosing the wrong series for a hub is a common ordering mistake that results in unusable stock.

How to read the number: The first two digits approximate the maximum bore diameter (in millimetres ÷ 10); the last two digits give the bush length in millimetres. A 2517 bush: maximum bore ≈ 75 mm, length = 44 mm (the nominal 17 approximates, not equals, the bore dimension in this series).
In practice, use the table below. Do not rely solely on the arithmetic — always cross-reference the series against the actual bore range specified by the manufacturer.
| Series | Min. Bore (mm) | Max. Bore (mm) | Bush Length (mm) | Fixing Screws | Screw Size | Typical Applications |
|---|---|---|---|---|---|---|
| 1008 | 9 | 25 | 21 | 2 | M6 | Small fans, light conveyors, sensor drives |
| 1108 | 9 | 28 | 21 | 2 | M6 | Light-duty pump drives, small pulleys |
| 1210 | 9 | 32 | 25 | 2 | M8 | Fan drives, small conveyor pulleys |
| 1215 | 9 | 32 | 38 | 2 | M8 | Wider hubs, same bore range as 1210 |
| 1310 | 9 | 35 | 25 | 2 | M8 | HVAC fan pulleys, light conveyor drives |
| 1610 | 14 | 50 | 42 | 3 | M8 | General industrial — most common small series |
| 2012 | 14 | 55 | 30 | 3 | M10 | Pump and compressor drives |
| 2517 | 15 | 75 | 44 | 3 | M10 | Conveyor head pulleys, medium fan drives |
| 3020 | 19 | 85 | 51 | 3 | M12 | Heavy conveyor drives, industrial fans |
| 3030 | 19 | 85 | 76 | 3 | M12 | Wide-hub version of 3020 — high torque applications |
| 3525 | 25 | 100 | 64 | 3 | M16 | Large conveyor drives, crusher drives |
| 4030 | 35 | 120 | 76 | 4 | M16 | Heavy industry — mining, quarrying |
| 4040 | 35 | 120 | 102 | 4 | M16 | High-torque version of 4030 |
| 4535 | 40 | 140 | 89 | 4 | M20 | Large industrial drives |
| 5040 | 50 | 160 | 102 | 4 | M20 | Heavy mining, cement, and steel plant drives |
| 5050 | 50 | 160 | 127 | 4 | M20 | Maximum-series — high torque, wide hub requirement |
Imperial bore bushes: All series above are also available with imperial (inch) bore sizes for equipment manufactured to US or older UK specifications. Imperial bores are common in agricultural machinery, American-origin plant, and pre-metric pump/compressor sets. The bush series designation is identical — only the bore dimension changes. AIMS can source imperial bore bushes on request.
Shaft Tolerances and Keyways: What You Need Before Fitting
Getting the shaft prepared correctly before the bush goes on is the single most effective way to prevent problems in service. Two things must be right: the shaft diameter tolerance, and the keyway geometry.
Shaft diameter tolerance
BS 4235 Part 2 specifies h8 as the recommended shaft tolerance for taper lock bushes. This is a clearance-to-zero tolerance — the shaft is at or slightly below the nominal diameter, allowing the bush to slide onto the shaft by hand and seat correctly before the screws are torqued. A shaft ground to h6 or h7 is also acceptable and gives a marginally snugger pre-fit.
Do not use taper lock bushes on shafts with interference tolerances (k6, m6, p6). The bush cannot be pushed onto an interference-fit shaft without damaging the taper surface — and if it can be forced on, it will be nearly impossible to remove without damaging both the bush and the shaft.
| Shaft Tolerance | Fit Type | Taper Lock Compatibility | Notes |
|---|---|---|---|
| h6 | Slight clearance to zero | ✅ Preferred | Ground shaft — optimal surface finish and dimensional control |
| h7 | Clearance to zero | ✅ Acceptable | Standard turned/ground shaft — good for most applications |
| h8 | Clearance | ✅ Standard per BS 4235 Pt 2 | Minimum recommended — allows hand assembly without force |
| h9, h11 | Wide clearance | ⚠️ Use with caution | Shaft undersized — bush may not generate full clamping force |
| k6, m6, p6 | Interference | ❌ Not compatible | Bush cannot be fitted; if forced, cannot be removed |
Keyway requirements
The keyway in the shaft must be machined to ISO 773 / BS 4235 dimensions for the relevant bore size. The key must be a close sliding fit in the keyway — not a hammer fit, not a loose rattle fit. A key that requires hammer driving to seat will generate asymmetric clamping forces across the bush bore and can cause the hub to run out-of-true.
Parallel keys are standard for taper lock applications. Woodruff (half-moon) keys are not used — the milling required for a Woodruff keyway removes more shaft cross-section and is unnecessary for this application.
Surface finish matters. The shaft surface where the bush sits should be free of rust, burrs, tool marks, and residual coating. If the shaft has been painted or has a zinc coating in the bore area, remove it completely before fitting — any raised surface will prevent the bush from seating correctly and reduce clamping force. A light coat of machine oil on the shaft eases installation and is acceptable; heavy grease is not (it hydroplanes under load and allows the bush to micro-slip).

How to Install a Taper Lock Bush: The Correct Sequence
Taper lock installation is straightforward when the sequence is followed precisely. Deviations — particularly tightening screws in one pass, or skipping the cross-tightening sequence — result in uneven seating, reduced clamping force, and eventual slip.
- Clean all mating surfaces. Degrease the bush taper, the hub bore, the shaft, and the key with a clean solvent (acetone or brake cleaner). The joint must be metal-to-metal clean — no oil, no grease, no residual cutting fluid.
- Check the bush for free rotation in the hub. Before fitting the shaft, insert the bush into the hub bore by hand and confirm it can rotate freely without resistance. If it binds, the taper bore may be damaged or contaminated — do not proceed until resolved.
- Fit the key. Insert the parallel key into the shaft keyway. The key should slide in with hand pressure and sit flush or 0.1–0.3 mm above the shaft diameter at most.
- Apply a light coat of machine oil to the shaft bore of the bush only. Do not oil the taper or the hub bore.
- Slide the bush onto the shaft and align the keyway in the bush bore over the key. The bush should slide on without resistance to approximately the correct axial position.
- Position the hub + bush assembly on the shaft at the required axial location. For pulleys and sheaves, this is typically the centreline of the drive face aligned with the belt or chain.
- Insert the fixing screws finger-tight into the installation holes (tapped holes). Do not put any screws in the extraction holes at this stage.
- Tighten the screws progressively in a cross pattern. Three passes: first to 25% of final torque, second to 60%, third to full specified torque. Refer to the manufacturer's datasheet for the specific torque value for the series.
- Check runout with a dial indicator. Acceptable runout for most industrial drives is ≤ 0.05 mm TIR. If excessive runout is present, the key may be oversized or the hub bore may be off-centre — remove and investigate.
- Re-torque after initial service run. After 24–48 hours of operation, retorque all fixing screws to the specified value. New bushes bed in slightly during initial running and screw pre-load can relax by 10–15%.
Installation torque reference — common series (dry thread, socket head cap screws, as-supplied):
| Series | Screw Size | Tightening Torque (Nm) |
|---|---|---|
| 1008, 1108 | M6 | 9–12 Nm |
| 1210, 1215, 1310 | M8 | 20–25 Nm |
| 1610 | M8 | 25–30 Nm |
| 2012, 2517 | M10 | 50–60 Nm |
| 3020, 3030 | M12 | 80–90 Nm |
| 3525, 4030, 4040 | M16 | 180–200 Nm |
| 4535, 5040, 5050 | M20 | 280–320 Nm |
Always verify against the manufacturer's datasheet. Values above are general guidance for lightly lubricated socket head cap screws (ISO 4762 / DIN 912, property class 8.8).
Why There Are Fewer Screws Than Holes
Every maintenance engineer eventually notices that a three-hole taper lock bush comes with only two screws. This is not a missing-parts problem. It is a deliberately engineered feature of the Taper Lock system.
The three holes in a taper lock bush serve two distinct functions:
- Installation holes (tapped): Two of the three holes are threaded. Screws tightened into these draw the bush axially into the hub taper, generating the clamping force that locks the assembly.
- Extraction hole (clearance, unthreaded): The third hole passes straight through the bush and lines up with a tapped hole in the hub face. When the same screws are transferred to this hole, tightening them bears against the hub face and jacks the bush back out of the taper — reversing the installation.
The two supplied screws are used for installation first, then transferred to the extraction position for removal. You never need more than two screws simultaneously — one hole is always empty.
How to identify which holes are which: Tapped holes (threaded) are the installation holes — run a screw finger-tight and it engages immediately. The clearance hole is smooth bore — a screw passes straight through without engaging thread. If in doubt, shine a torch through: the tapped holes show thread reflection; the clearance hole shows daylight through to the hub bore.
For the 4030–5050 series (four-hole pattern), the same logic applies: three tapped installation holes, one clearance extraction hole, three screws supplied.
How to Remove a Taper Lock Bush
Correct removal takes less than five minutes when the bush has been properly installed and maintained. It takes considerably longer — and risks damage — when the bush has seized.
Standard removal sequence
- Remove all installation screws completely and set aside.
- Clean the threads of the extraction hole in the hub face with a pick or wire brush.
- Transfer the screws to the extraction (clearance) holes — passing through the bush and engaging the threaded holes in the hub face behind it.
- Tighten the extraction screws progressively and alternately. They bear against the hub face and drive the bush back out of the taper.
- Once the taper releases, the bush and hub assembly will move freely on the shaft — slide off.
Removing a seized taper lock bush
Taper lock bushes seize due to: corrosion between the bush taper and hub bore (particularly on outdoor or wash-down equipment), fretting corrosion from micro-slip, or over-time metal-to-metal adhesion on un-lubricated assemblies. The extraction sequence above is still the correct first attempt — apply progressive torque before trying anything else.
- Apply a penetrating oil (Inox MX3, WD-40 Specialist, or equivalent) liberally at the bush/hub interface — the gap at the split line is the best entry point. Allow 30–60 minutes to penetrate.
- Attempt the standard extraction sequence again. If the screws are bottoming out without releasing the bush, use longer extraction screws (same diameter/thread pitch, longer grip length) to maintain progressive jack force.
- Apply heat carefully to the hub — not the bush. Heating the hub causes it to expand fractionally, relaxing the grip on the bush taper. Use a heat gun rather than a torch; if using a torch, keep the flame moving and avoid sustained spot heating.
- As the hub expands, apply progressive extraction torque simultaneously.
- If the bush still will not release: use a drift punch in the split of the bush (the longitudinal slot) to expand the split slightly. This reduces the grip on the shaft and hub simultaneously and is usually enough to release the assembly.
Do not: Strike the hub face with a hammer to drive the bush out — you will crack a cast iron hub. Do not use a flame on rubber-lagged or plastic-rim pulleys. Do not heat the shaft — shaft expansion will tighten the bush bore grip, not loosen it. If the bush has corroded to a stainless steel shaft, use anti-galling precautions (penetrating oil + copper-paste) before applying heat.
After extraction, inspect the bush taper and hub bore. If the taper shows galling (surface tear marks), the bush should be replaced. If the hub bore shows deep scoring, the hub should be replaced — a new bush in a damaged hub will not seat correctly and will always be prone to slip.
Steel vs Cast Iron: Which Taper Lock Bush Material Should You Choose?
Most catalogued taper lock bushes — and most of the stock you will find at any Australian supplier — are cast iron (grey or ductile iron). Cast iron has the compressive strength needed to generate clamping force under the fixing screws, machines cleanly, and holds dimensional accuracy well. For the majority of industrial drive applications, cast iron is the correct choice.
Steel taper lock bushes exist for applications where cast iron's limitations become critical. Here is how to decide:
 |
 |
|
|---|---|---|
| Property | Cast Iron | Steel |
| Cost | Lower | Higher (20–50% premium typical) |
| Tensile strength | Moderate (grey iron ~200 MPa) | High (mild/alloy steel 400–800+ MPa) |
| Impact resistance | Brittle — cracks under shock load | Ductile — deforms without fracture |
| Corrosion resistance | Rusts readily without protection | Also rusts — but can be surface treated |
| Galvanic risk (with SS shaft) | Higher (cast iron + SS = active pair) | Lower with anti-galling compound |
| Machinability (boring to size) | Excellent — machines cleanly | Good — slightly harder to machine |
| Seizure risk on removal | Can gall onto SS shafts | Lower with correct anti-seize |
| High-shock applications | Not recommended | Recommended |
| Food processing / washdown | Not recommended | Stainless steel variant available |
When to specify steel
- Crusher, screen, and shaker drives: High shock loading will crack cast iron bushes over time. Steel or ductile iron is mandatory.
- Food processing and washdown environments: Cast iron corrodes rapidly in regular washdown. Stainless steel taper lock bushes (or stainless steel hubs with steel bushes) are used in dairy, meat processing, and beverage plant.
- Stainless steel shafts: Use a steel bush with anti-seize compound to minimise galling risk during both installation and removal.
- Marine and offshore environments: Cast iron corrodes in salt air. Steel with surface treatment (zinc plating, phosphate) is preferred.
- High-torque reversing drives: Where load direction reversal is frequent (hoists, reversing conveyors), the impact fatigue resistance of steel is a tangible advantage.
Ductile iron (SG iron / nodular iron): Many premium taper lock bushes are cast from ductile iron rather than grey iron. Ductile iron has significantly better impact resistance than grey iron (comparable to mild steel in toughness) while retaining the casting advantages of iron. If a catalogued bush is specified as "ductile iron" or "SG iron", it is a substantial upgrade over standard grey iron for moderate-shock applications and does not carry the full cost premium of a machined steel bush.
QD Bushing vs Taper Lock: Key Differences
Both systems mount power transmission components onto shafts using a tapered sleeve and fixing screws, but they are not interchangeable and are dominant in different markets. Understanding the difference prevents wrong-specification ordering — particularly when replacing components on older or imported equipment.
| Feature | Taper Lock Bush | QD Bushing |
|---|---|---|
| Taper ratio | 1:12 (4.76°) | 1:6 (9.46°) |
| Standard | BS 4235 Part 2 | AGMA / ANSI (US) |
| Market prevalence | Australia, Europe, UK | North America (dominant), some AU OEM |
| Hub design | Plain bore hub, bush inserts from face | Flanged hub, bush seats from flange side |
| Assembly method | Bush inserted, screws tighten into bush | Hub assembled around bush on shaft, screws clamp flange |
| Screw access | From drive face of hub | From flange face (outside of drive) |
| Removal | Screws transferred to extraction holes | Screws moved to jack-bolt holes in flange |
| Interchangeability | Any BS 4235 Pt 2 compliant supplier | Any AGMA-compliant supplier (QD series: SH, SK, SF, E, F, J, M, N, P, Q, S) |
| Ease of axial adjustment | Good — slide before torquing | Moderate — flange limits adjustment range |
If you are replacing a component on a piece of American-origin plant (e.g. Dodge, Rexnord US, Martin Sprocket) and the hub has a flanged face with an external bolt circle, it is almost certainly a QD bushing installation. QD bushes are designated by letter codes (SH, SK, SF, E, F, J, M, N, P, Q, S) rather than four-digit numbers.
Taper lock bushes fit the Australian industrial market because BS 4235 Part 2 is the dominant standard for locally and European-sourced plant. Both systems work reliably — the choice is dictated by what the hub is designed for, not by performance preference.
Keyless Shaft Locking: Alternatives to Taper Lock Bushes
Taper lock bushes require a keyway in both the shaft and the bush bore. Cutting a keyway requires a broach or a keyway milling machine — not always available in the field — and the keyway itself is a stress concentration in the shaft. For applications where keyway machining is not practical or where you need to transmit high torque without a keyway, keyless shaft locking devices are the engineered alternative.
These devices — sold under names including Fenner B-LOC, Ringfeder RFN, Trantorque, and Tollok — work by clamping the hub directly to the shaft through radial friction force, generated by tightening a series of fasteners that compress a conical interface. They are entirely keyless: no keyway in the shaft, no keyway in the hub bore.
When keyless locking makes more sense than taper lock
- No keyway possible: Hollow shafts, worm gear shafts, and some motor shafts cannot accommodate a keyway without structural compromise.
- Field installation without a machine shop: A keyless locking device can be installed on a smooth shaft without special tooling — only a torque wrench is needed.
- Fine angular positioning: Cams, eccentric drives, and indexing mechanisms require precise angular setting. Keyless locking allows the hub to be positioned at any angle before clamping, with no key to align.
- High shock or reversing loads: Keyless clamping distributes load over a large contact area. Key drives concentrate load at the key edges and keyway root — fatigue failure starts here under high-cycle shock.
- Large shaft diameters: Above 150 mm shaft diameter, keyless locking is often more economical than a large taper lock bush assembly.
Note on AIMS stock: AIMS Industrial stocks taper lock bushes across the full 1008–5050 series. For keyless locking device enquiries, contact the AIMS sales team — keyless devices are a specialist item quoted to application. For shaft coupling applications where keyless mounting is part of a larger alignment solution, see the Shaft Couplings Guide.
Taper Lock Bushes with Pulleys, Sprockets and Sheaves
Taper lock bushes are the standard mounting method for four of the most common power transmission components in Australian industry: V-belt pulleys, synchronous (timing belt) sprockets, roller chain sprockets, and V-groove sheaves, and flexible coupling hubs. Understanding how the bush interfaces with each component helps with selection and troubleshooting. Taper lock hubs are also used with jaw, HRC and cone ring couplings — see the Flexible Coupling Guide for hub configuration and coupling selection guidance.
V-belt pulleys
V-belt pulleys (also called V-belt sheaves) are the most common application for taper lock bushes in Australian industry. The pulley hub is machined to accept the standard BS 4235 Part 2 taper, and the bush series is stamped on the hub flange. Pulley groove alignment is critical for belt life — after fitting, check that the grooves of both pulleys are in line across the full drive face using a straight edge or laser alignment tool. A misaligned drive caused by an incorrectly positioned taper lock bush is a leading cause of premature V-belt failure.
Timing belt sprockets
Synchronous (timing belt) sprockets use taper lock bushes in the same way as V-belt pulleys, but angular accuracy is more critical — tooth profile alignment errors cause belt tracking failure and edge wear. When fitting a timing belt sprocket, confirm that the sprocket flange faces are running true (dial indicator check, ≤ 0.03 mm TIR is the typical tolerance for precision timing drives). See the Synchronous Timing Belt Guide for full drive design context.
Roller chain sprockets
Roller chain sprockets are routinely mounted on taper lock bushes, particularly for sprockets that need periodic repositioning or replacement. The installation procedure is identical to V-belt pulleys. The key alignment check for roller chain is axial — the sprocket centreline must be within the drive chain's maximum permissible misalignment (typically ≤ 1° angular and ≤ 3 mm parallel offset for standard ANSI chain). A sprocket that has been incorrectly positioned axially by an incorrectly seated taper lock bush causes chain edge contact and rapid wear. See the Industrial Roller Chain Guide for chain drive alignment requirements.
Flexible couplings
Many flexible shaft couplings — particularly jaw couplings, Fenaflex tyre couplings, and disc couplings — use taper lock bushes to mount the coupling halves onto the driver and driven shafts. The same BS 4235 Part 2 procedure applies, but coupling installation requires additional attention to shaft-to-shaft alignment after the bushes are fitted. For a full treatment of coupling types and alignment requirements, see the Shaft Couplings Guide.
Common Taper Lock Bush Problems and Solutions
Most taper lock bush problems in service trace back to one of four root causes: contamination at assembly, incorrect shaft tolerance, insufficient screw torque, or incorrect size selection. The table below maps symptoms to probable causes and remediation steps.
| Symptom | Most Likely Cause | Remediation |
|---|---|---|
| Bush slips on shaft under load | Insufficient screw torque; contaminated taper surface; shaft undersize | Remove bush, clean taper, check shaft tolerance, reinstall and torque correctly. Re-torque after 24h run. |
| Excessive vibration after fitting | Bush not fully seated; hub running eccentric; bent shaft | Check runout with dial indicator. If hub is eccentric, remove and inspect taper bore for damage. Verify key is not oversized. |
| Bush will not release on removal | Corrosion or fretting at taper interface; over-torqued screws | Penetrating oil + soak, progressive extraction torque, heat on hub body. See removal section above. |
| Fixing screws pulling out of threads | Wrong screw length; stripped extraction hole; wrong screw grade | Use correct length screws (Grade 8.8 minimum). If extraction hole is stripped, thread-repair with Helicoil or Recoil insert. |
| Hub cracked after removal attempt | Hammer impact on cast iron hub; heat applied too aggressively | Replace hub. Do not use hammers on cast iron hubs. Replace with steel or ductile iron hub if shock is an ongoing issue. |
| Keyway fretting (rust-coloured powder at key interface) | Key loose in keyway; shaft/bush tolerances out of spec | Replace key with correct size. Inspect shaft keyway for wear. Apply Loctite 641 retaining compound to key on reassembly if keyway is marginally worn. |
| Belt tracking off-centre | Pulley incorrectly positioned axially; bush not fully seated | Re-fit with dial indicator check. Confirm taper fully seated before torquing. Check belt and sheave groove alignment. |
Maintenance and Inspection Schedule
Taper lock bushes are low-maintenance components, but they benefit from scheduled inspection — particularly in environments with vibration, temperature cycling, or process washdown.
- Initial re-torque: After the first 24–48 hours of operation, re-torque all fixing screws to the specified value. This compensates for initial bedding-in relaxation.
- Quarterly inspection (or at each planned maintenance shutdown): Check fixing screw torque. Inspect the bush split and adjacent hub bore for fretting corrosion (reddish-brown powder residue). Check for lateral play in the hub by pushing the hub face sideways — any movement indicates the bush has loosened or the shaft has worn.
- Annual inspection or on disassembly: Remove the bush, clean and inspect the taper surfaces, check the key and keyway for wear, verify shaft tolerance has not changed due to wear. Re-apply light machine oil to the bush bore before refitting.
- Corrosion protection: On outdoor, coastal, or washdown equipment, apply a protective coating (zinc-rich spray, wax, or silicone grease) to exposed bush and hub surfaces between shutdowns. Do not apply grease to the taper bore interface.
Record-keeping tip: Tag each drive with the bush series, bore size, screw torque, and last-check date. This information is not on the bush — once a bush is installed in a hub, the series stamp is hidden. A recorded drive card prevents re-identification delays at the next maintenance event and ensures correct replacement parts are ordered without pulling the hub off to check.
Buying Taper Lock Bushes in Australia
Taper lock bushes are manufactured to BS 4235 Part 2, which means they are fully interchangeable between suppliers at the same series designation and bore size. You do not need to match manufacturer brands — an AIMS-supplied 2517 bush with 45 mm bore will seat correctly in a Fenner, Dodge, or Rexnord 2517 hub.
When ordering, you need to specify three things:
- Series: e.g. 2517 — determines the hub compatibility and maximum bore range.
- Bore diameter: The actual shaft diameter in millimetres (metric) or inches (imperial). The bush is bored to this dimension.
- Keyway: Standard parallel keyway dimensions are machined as a default. Specify if you require no keyway, or a non-standard keyway dimension.
AIMS Industrial stocks taper lock bushes across the full 1008–5050 series in common metric bore sizes for same-day or next-day despatch from Sydney. Less common bore sizes and imperial bores are available on request with a short lead time.
Browse the AIMS Industrial taper lock bushes range →
For V-belt pulleys, timing sprockets, chain sprockets, and other taper-lock-mounted drive components, the AIMS power transmission range carries compatible hubs across the same series.
Frequently Asked Questions
What is a taper lock bush?
A taper lock bush is a split, tapered sleeve that locks a power transmission component — such as a pulley, sprocket, or sheave — onto a shaft. The 1:12 external taper engages the matching bore of the hub; tightening the fixing screws draws the bush inward, generating a high clamping force without requiring a press fit. The bush transmits torque via a parallel key seated in a matching keyway on both the bush and the shaft.
What do taper lock bush numbers mean — for example, 1610 or 2517?
The four-digit code identifies the size series. The first two digits indicate the nominal bore range (maximum bore approximately equal to the first two digits × 10 mm); the last two digits indicate the bush length in millimetres. A 1610 bush has a maximum bore of around 50 mm and is 42 mm long. A 2517 bush has a maximum bore of around 75 mm and is 44 mm long.
What shaft tolerance is required for a taper lock bush?
BS 4235 Part 2 specifies shaft tolerance h8 as the recommended fit for taper lock bushes. H8 gives a light interference to clearance fit that allows assembly by hand but prevents shaft movement after the bush is tightened. Shafts ground to h6 or h7 also work and give a slightly tighter pre-fit. Avoid k6 or m6 (interference) shafts — the bush cannot be inserted without damage.
Can you use a taper lock bush without a key?
Most taper lock bushes require a parallel key to transmit torque. However, keyless installation is permitted for very light or unidirectional loads if the manufacturer's datasheets confirm it, and the hub's keyway is left open. For truly keyless applications requiring higher torque, keyless shaft locking devices (such as Fenner B-LOC, Ringfeder, or Trantorque) are engineered alternatives to taper lock bushes.
Why does a taper lock bush have fewer screws than holes?
The holes serve two distinct purposes: installation holes (tapped) draw the bush into the hub when screws are tightened into them; extraction holes (clearance) drive the bush back out when screws are transferred and tightened against the hub face. For a three-hole pattern, two screws are supplied — they are used in the two tapped installation holes, then transferred to the clearance extraction holes for removal. One hole is always left empty at any given time.
How do you remove a taper lock bush that is seized?
First remove all installation screws and transfer them to the extraction (clearance) holes. Tighten the screws progressively and evenly — they bear against the hub face and jack the bush back out. If the bush will not move, apply penetrating oil at the interface, allow 30 minutes, then repeat. Do not hammer the hub face; do not use heat without removing any sealing compound first. Severely seized bushes on stainless shafts may require mechanical splitting with a cold chisel at the bush split, as a last resort.
What is the difference between a taper lock bush and a QD bushing?
A QD (Quick Detach) bushing uses a 1:6 taper — steeper than the 1:12 taper of a taper lock bush. QD hubs are flanged and split along the face, allowing the hub to be assembled around the bush before tightening. QD bushes are prevalent in North American OEM equipment; taper lock bushes are dominant in Australian, European, and UK industrial applications. The two systems are not interchangeable — they have different bolt circles, taper angles, and hub designs.
What torque should I use to tighten taper lock bush screws?
Tightening torque is specified by the bush series, not by screw size alone. As a general guide: 1008–1310 series use M6 screws at approximately 9–12 Nm; 1610–2012 series use M8 screws at approximately 25–30 Nm; 2517–3030 series use M10 or M12 screws at approximately 50–80 Nm; 4030–5050 series use M16 screws at approximately 180–200 Nm. Always refer to the manufacturer's datasheet for the specific series. Tighten in a cross pattern in three progressive passes.
Can taper lock bushes be reused?
Yes, taper lock bushes can be reused provided the taper bore is undamaged, the keyway shows no fretting or deformation, and the fixing screws retain full thread engagement. Clean both the bush taper and hub bore with solvent, inspect for pitting or galling, and lightly grease the taper before refitting. If a bush has been seized and required forced extraction, inspect the taper carefully — any scoring or raised metal must be dressed with a fine file before reuse.
What is the taper angle of a taper lock bush?
Taper lock bushes have a 1:12 taper (also expressed as 4.76° included angle or approximately 2.39° per side). This is a self-locking taper — when driven home, the clamping force maintains itself without fastener pre-load alone. By comparison, a QD bushing uses a 1:6 taper, and a Morse taper (used in machine tool spindles) uses 1:19.002. The 1:12 ratio is specified in BS 4235 Part 2.
What is the difference between cast iron and steel taper lock bushes?
Standard taper lock bushes are cast iron (grey or ductile), which provides adequate strength for most conveyor, fan, and pump drives. Steel taper lock bushes are used in high-shock, high-torque, or corrosive environments — including food processing, marine, and chemical plant — where cast iron's brittleness would risk failure. Steel bushes cost more but accept higher dynamic loads and are less prone to cracking on seizure. Steel bushes are also recommended when mounting on stainless steel shafts to reduce the risk of galling.
How do I know which taper lock bush fits my pulley or sprocket?
The hub of a taper lock pulley or sprocket is stamped or labelled with its bush series (e.g. '2517' or 'TL2517'). Cross-reference the required shaft bore against the size table for that series — for example, a 2517 bush can be bored from a minimum of 15 mm to a maximum of 55 mm. If the shaft bore exceeds the maximum for that series, the next larger series is required. AIMS Industrial holds stock across all major series — see the taper lock bushes collection for current bore availability.
Are taper lock bushes metric or imperial?
Taper lock bushes are made in both metric and imperial bore sizes. Australian industrial plant predominantly uses metric shafts, so metric bore stock is standard. Imperial bore bushes (in inch fractions) are available for older imported equipment — particularly US and UK-origin machinery. The bush series designation (e.g. 2517) is the same regardless of bore dimension — only the bored diameter differs. Most suppliers, including AIMS, carry standard metric bores and can source imperial bores on request.
What causes a taper lock bush to slip on the shaft?
Bush slip is caused by: insufficient screw torque (most common), incorrect shaft tolerance (shaft undersize allows the bush to seat before adequate clamping force is reached), contamination of the taper surface with oil or grease at assembly, a damaged or missing key, or a bushing that has been incorrectly matched to the hub (wrong series). Slipping generates heat and fretting — if caught early, re-torquing after cleaning and dressing the taper may recover the joint; if fretting is visible, replace the bush.
Can I fit a taper lock bush on a stainless steel shaft?
Yes, but use a steel taper lock bush rather than cast iron, and lubricate the shaft with an anti-galling compound (copper-based anti-seize or molybdenum disulphide paste) before fitting. Stainless-on-cast-iron contact risks galling and surface pick-up during installation and removal. Steel-on-stainless contact with anti-seize is far more manageable. Check the shaft tolerance is h8 or better — stainless shafts are sometimes supplied with wider tolerances than standard engineering steel.
Our Pulley Speed Ratio guide covers the speed-vs-diameter relationship for V-belt and timing-belt drives.
For complete metric bolt sizing (M3-M24) with thread pitch and head dimensions, see our Metric Bolt Size Guide.
People Also Ask — Taper Lock Bushes
Q: How does a taper lock bush work?
A taper lock bush is a split, tapered steel sleeve that transmits torque from a shaft to a power transmission component such as a V-pulley, timing pulley, or sprocket. The bush sits inside a matching tapered bore in the component hub. When the retaining bolts are tightened, they pull the bush deeper into the taper, causing the split bush to compress inward and clamp firmly onto the shaft while simultaneously locking the bush to the hub. This creates a secure, concentric fit that transmits high torques without a separate external locking mechanism beyond the mounting bolts.
Q: How do you remove a taper lock bush from a pulley?
To remove a taper lock bush, first remove the retaining bolts from their tightening positions and reinsert them into the extraction holes — threaded holes in the flange used specifically for removal. Tightening these extraction bolts pushes the flange against the hub face, jacking the bush back out of the taper. If the bush is seized, apply penetrating oil around the joint and allow time to soak before attempting removal. Never strike the hub or pulley to drive the bush out — this can crack the cast hub. Always confirm which are the tightening holes and which are the extraction holes before starting, as the two sets serve opposite purposes.
Q: Can the same taper lock bush be used in different pulleys?
Yes — taper lock bushes are standardised to specific series numbers (1008, 1210, 1615, 2012, 2517 etc.) and any taper lock component with the matching series bore will accept that bush. A 1615-series bush fits any 1615-bore V-pulley, timing pulley, sprocket, or coupling hub from any manufacturer. This interchangeability is one of the key advantages of the taper lock system — pulleys, sprockets, and bushes can be sourced separately and mixed across suppliers, and existing hubs can be rebored to accept a different shaft diameter without replacing the entire assembly.
Q: What is the maximum shaft diameter I can use with a taper lock bush?
Each taper lock bush series accommodates a defined range of shaft diameters. The bore of a new bush is undersized; it is bored to the specified shaft diameter (and keyway if required) at the time of manufacture or by a machinist. Each series has a maximum bore limit beyond which the bush wall becomes too thin to maintain clamping integrity. Consulting the bush series specification confirms the available bore range before ordering — oversizing the bore beyond the series maximum is not permitted, as it compromises the structural integrity of the split bush.
Q: Do taper lock bushes require a keyway?
Keyways are common but not mandatory with taper lock bushes. For moderate torque applications, the clamping force from the bush alone — on a correctly sized bush on a ground shaft — can be sufficient to prevent rotation. For higher torques, reversing drives, or shock-loaded applications, a parallel key running in keyways in both the shaft and the bush provides additional positive drive as a backup to the clamping force. Bush manufacturers publish torque capacity data for both plain-bore and keyed configurations; selecting the configuration based on calculated drive torque and service factor ensures the assembly is correctly specified.
Looking for taper pipe reamers? Our taper pipe reamers range covers the common sizes and brands.